

A mudroom that stays organized takes more than a bench and a few coat hooks. The layout has to match your entryway’s footprint, doors and drawers have to clear each other, and every household member needs a defined zone.
This guide covers three core layouts with worked floor-plan examples, key dimensions, bench configurations, family storage zoning, typical costs, and a pre-planning checklist.
About the numbers: Dimensions here come from common ergonomic conventions and standard US cabinet sizes (base cabinets are typically 24″ deep, wall cabinets about 12″ deep). Treat every figure as a starting point, and verify it against your own measurements and your cabinet or hardware manufacturer’s specifications.

1. Mudroom Layout Ideas by Entryway Space
| Layout Type | Best For | Core Design Consideration |
|---|---|---|
| Straight-Line (Linear) | Single wall, narrow hallways | Keeps depth shallow to preserve the walkway |
| L-Shaped (Corner) | Square mudrooms, entry nooks | Uses two adjacent walls to add storage |
| Parallel (Pass-Through) | Corridors between garage and home | Balances depth on facing walls to keep a clear aisle |
Straight-Line (Linear) Layout
Best for: Narrow hallways, garage entry corridors, or any entryway with one dedicated wall.
Design strategy: Keep bench depth between 15″ and 18″ so it doesn’t crowd the walking path. Stack everything on one wall: hooks above, bench seat below, shoe storage under the seat.
Traffic clearance: A 36″ clear walkway is a useful starting point, measured from the front edge of the empty bench to the opposite obstruction.
Worked Example: A 60″ (5-Foot) Hallway

| Condition | Calculation | Clear Walkway |
|---|---|---|
| Empty bench | 60″ − 16″ | 44″ |
| Shoes parked at the bench front (assume they extend up to 2″ past the bench edge) | 44″ − 2″ | about 42″ |
| One person seated, feet extended (assume about 12″–18″ past the bench edge; measure your own household) | 44″ − 12″ to 18″ | about 26″–32″ |
A seat cushion sits on top of the bench, so it adds little floor depth unless it overhangs the edge. The real squeeze comes from shoes and seated feet. The 36″ starting point holds for an empty bench, but passing someone who is seated gets tight in a 60″ hallway. If that describes your household’s morning rush, choose a shallower bench (15″) or a wider hallway.
L-Shaped (Corner) Layout
Best for: Square mudrooms or dedicated entryway nooks.
Design strategy: Put seating and the tall storage tower on one wall, and keep the adjacent wall open for hooks.
Design tip: Avoid drawers or cubbies in the interior corner. Doors and drawers from two walls can collide, and the corner is hard to reach anyway.
Worked Example: An 8′ × 8′ Nook (96″ × 96″)
This layout uses one tower, placed at the end of Wall A, with the bench beside it. Wall B carries only hooks, so no cabinet doors compete for the same floor space.
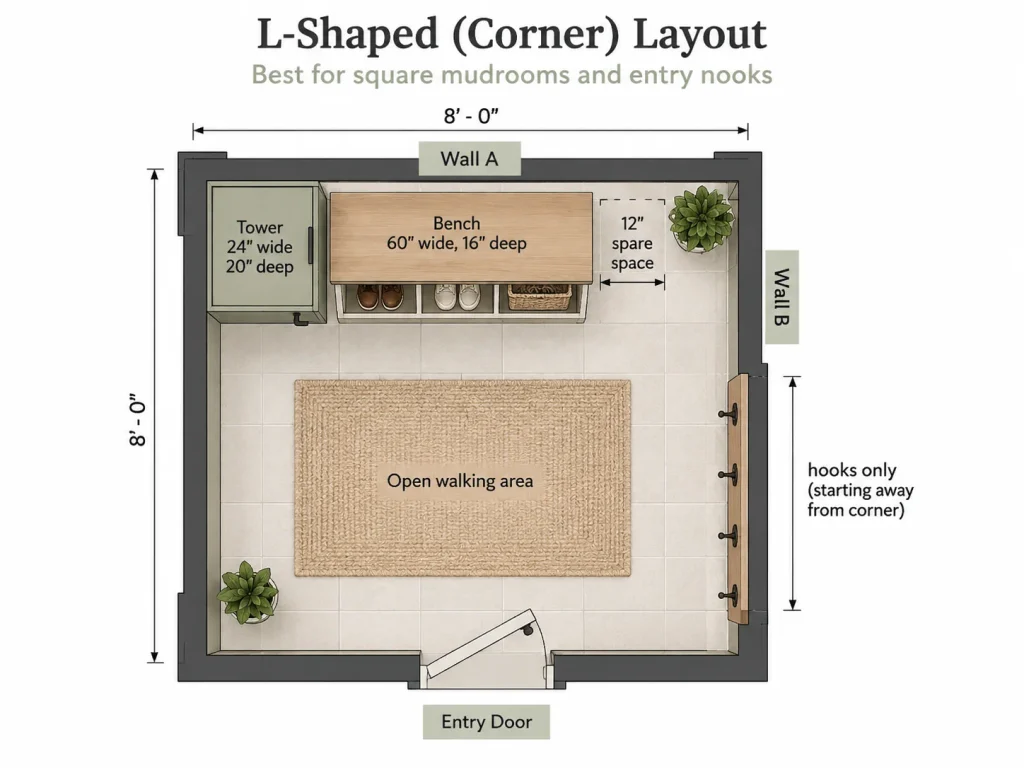
Wall A layout (96″ total):
| Piece | Width along the wall | Depth into the room |
|---|---|---|
| Tower (one unit) | 24″ | 20″ |
| Bench | 60″ | 16″ |
| Spare space | 12″ | n/a |
| Total | 96″ |
The 12″ of spare space absorbs trim, an outlet, or small measuring errors. Real rooms are rarely exactly 96″.
Clearance checks:
- Bench front to opposite wall: 96″ − 16″ = 80″.
- Tower front to opposite wall: 96″ − 20″ = 76″.
- If an entry door swings inward from Wall C, mark its full swing arc on the floor and verify that it clears the bench and tower. The remaining usable space depends on the door’s hinge location, opening angle, and the position of nearby storage units.
- Hinge the tower door on the corner side so it swings away from Wall B, and keep the hook rail at least 24″ from the corner so coats don’t catch on the door.
Parallel / Pass-Through Corridor Layout
Best for: Spaces between the garage and the main living area.
Design strategy: Put seating and daily-use hooks on one wall, and tall closed cabinetry or utility storage on the other.
Recommended Depth for Each Wall
| Wall | Typical Depth | What Goes There |
|---|---|---|
| Seating wall | 15″–18″ | Bench, hooks above, shoe storage below |
| Opposite wall (shallow) | 12″–15″ | Wall-style cabinets, hook rail with shelf, narrow lockers |
| Opposite wall (standard) | 18″–24″ | Tall lockers, pantry-style or utility cabinets |
How to Calculate Corridor Width
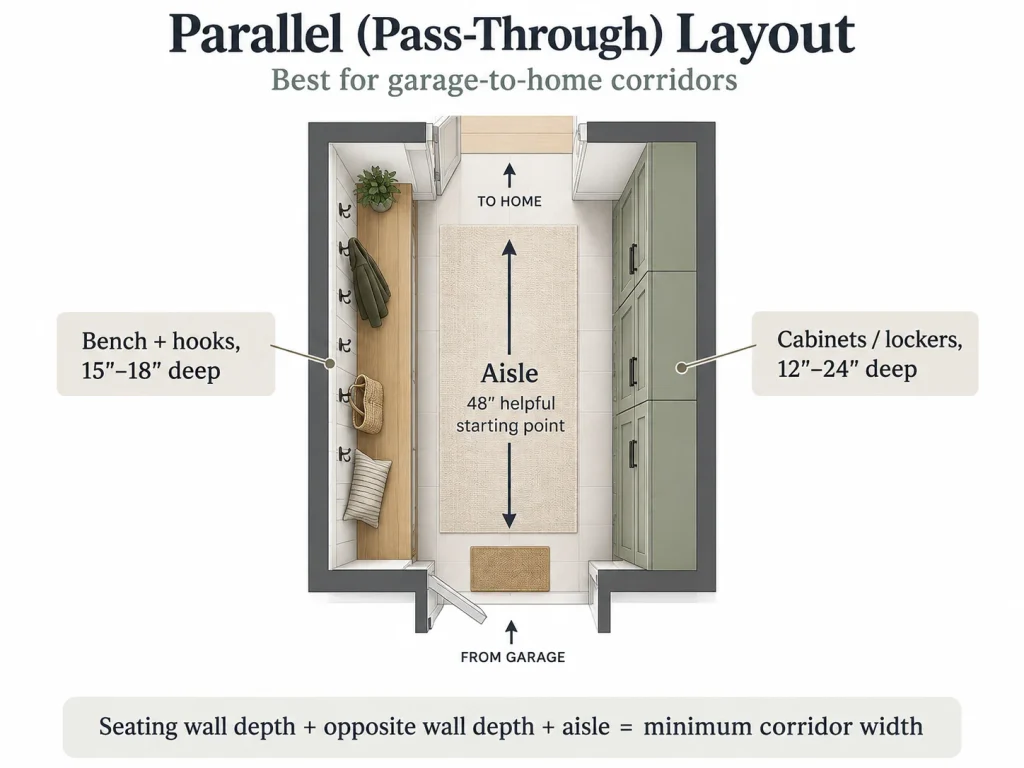
Seating wall depth + opposite wall depth + aisle = minimum corridor width
The aisle should stay usable when something is open, so add the largest door or drawer extension on one side to a 36″ walking path (this assumes one door or drawer open at a time):
| Scenario | Seating Wall | Opposite Wall | Aisle Needed | Total Width |
|---|---|---|---|---|
| Tight, open storage only (no doors or drawers) | 15″ | 12″ | 36″ | 63″ (5’3″) |
| Comfortable, bench drawers (about 14″ extension) | 16″ | 15″ | 36″ + 14″ = 50″ | 81″ (6’9″) |
| Utility tower with a 24″-wide hinged door (about 24″ swing) | 18″ | 24″ | 36″ + 24″ = 60″ | 102″ (8’6″) |
In a narrow corridor, open cubbies, sliding doors, or narrower doors shrink the width you need. Confirm drawer extension and door swing from your hardware’s specifications.
2. Spatial Clearances and Door Swing Considerations
A common layout mistake is overlooking how doors and drawers operate together at busy moments, such as everyone leaving for school at once.
Critical clearance checklist:
- Entry door swing: Confirm entry doors open freely without striking the bench edge or side towers.
- Drawer and door extension: Measure the full extension of pull-out drawers before installing. In tight entryways, open cubbies or sliding doors are often more practical.
- Passageway clearance: Plan a path that works at peak times, with one drawer or door open.
- Garage-entry corridors: Check the swing of nearby doors, a water heater closet, or a washer/dryer door.
3. Recommended Dimensions for Bench and Wall Storage
| Storage Zone | Recommended Range | Functional Consideration |
|---|---|---|
| Adult bench height | 18″–20″ | Standard seating height for tying shoes |
| Kids’ bench height | 12″–14″ | Lower seat for toddlers and young children |
| Bench depth | 15″–18″ | Adequate seat support with a small footprint |
| Adult hook height | 54″–66″ | Lower end suits shorter users; higher end keeps long coats from dragging |
| Kids’ hook height | 36″–42″ | Lets young children hang their own items |
| Tall utility tower depth | 20″–24″ | Confirm vacuum and charging-base dimensions before building |
How to use these numbers:
- Bench height: 18″–20″ follows common chair-height conventions. A standard dining chair seat is about 18″.
- Hook height: Hang your longest coat on a nail first, measure it, and add a couple of inches so the hem clears the bench seat.
- Reach: If someone in the household uses a wheelchair or has limited reach, keep at least one hook row and a storage zone at a lower, easier-to-reach height. The ADA Standards use a 15″–48″ range for unobstructed reach, but the right numbers depend on how the person approaches the unit and what’s in the way, so treat that range as a general reference only.
- Tower depth: 24″ matches standard base cabinet depth, so towers built from stock cabinets are easy to source.
4. Bench Configurations: Open Cubbies, Drawers, and Lift-Tops
The storage under the bench should match your maintenance habits and space limits.
Open Cubbies
Best for high-traffic entrances where quick shoe access matters.
- Footwear stays visible, so fabric bins or woven baskets help it look tidy.
- Open sides let wet shoes air dry, which reduces odor and mildew.
- Add a removable boot tray on the bottom level for snow and mud.
Pull-Out Drawers
Keep shoes, gloves, and small accessories hidden for a clean look.
- Clearance: Leave enough floor space to fully extend the drawers and stand beside them.
- Hardware: Look for full-extension slides and check the manufacturer’s per-drawer weight rating. Shoes and boots are heavy.
- Ventilation: Closed drawers trap moisture. Slatted or perforated drawer bottoms help, and visibly wet shoes should dry on an open shelf or tray first.
Lift-Top Benches
Offer deep, undivided volume for off-season gear and bulky equipment.
- Moisture and odor: A sealed lid traps humidity. Use a lift-top for dry, off-season items, not as the daily wet-shoe spot. If you store footwear, add ventilation holes, a washable liner, or a tray, and air items out regularly.
- Hinge safety: Choose soft-close or lid-support hinges that hold the lid open and keep it from dropping. This protects small fingers.
- Seat clutter: Clear cushions and bags before opening the lid.
For a closer look at shoe capacity, seat weight limits, and specific bench styles, see our detailed guide on mudroom benches with shoe storage.
5. Planning Family Storage Zones
To keep clutter from piling up, organize vertically by how often items are used, instead of giving each person one cubby for everything.
Vertical Division Strategy
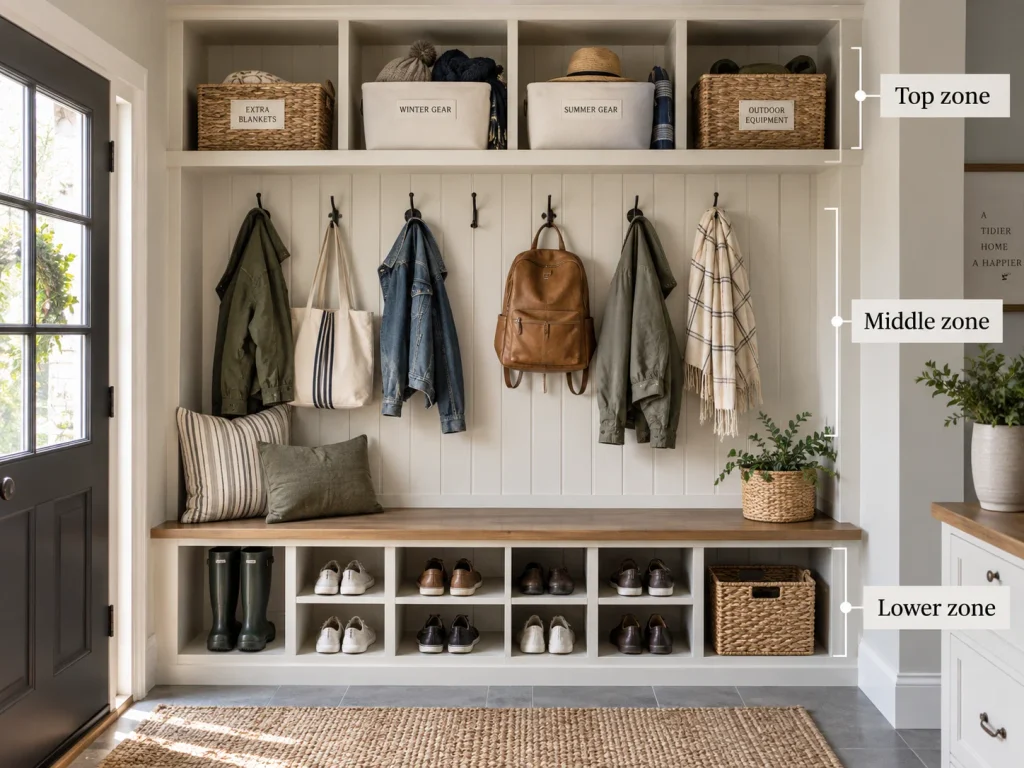
- Top zone (above 66″): Off-season accessories, rarely used items, labeled bins.
- Middle zone (36″–66″): Coats, keys, and daily bags. Assign specific hooks to each family member.
- Lower zone (below 36″): The bench plus cubbies or drawers dedicated to footwear.
Capacity by Household Size
- 1–2 people: A linear bench 36″–48″ wide with 4 hooks and dedicated shoe cubbies typically covers daily needs.
- 3+ people: Plan for a bench 60″ or wider, or an L-shaped layout, plus a side tower or utility locker for outer layers and school or sports gear.
Estimating Shoe Capacity from Interior Width
Count the usable interior shelf width, not the outside width of the bench. Side panels and dividers take space.
| Bench Width | Side Panels (two at ¾”) | One Center Divider (¾”) | Usable Width | Adult Pairs at 8″–10″ Each |
|---|---|---|---|---|
| 60″ | 1½” | ¾” | about 57¾” | 5–7 pairs per shelf level |
For everyday planning, assume about 5–6 pairs per level, since boots and wider shoes need more than 8″. Check the manufacturer’s listed interior dimensions.
6. Structural Options: Freestanding vs. Modular vs. Custom Built-In
Costs below are rough planning ranges for the US. They are general estimates, not current quotes, and vary widely by region, materials, and labor. Get local quotes before budgeting.
| Freestanding | Modular Wall System | Custom Built-In | |
|---|---|---|---|
| Typical cost | About $150–$800 | About $500–$3,000 | About $2,500–$10,000+ |
| Installation | No permanent work | DIY or handyman | Professional carpenter |
| Best for | Renters, flexible setups | Homeowners wanting a tailored look | Long-term homeowners |
| Main drawback | Fixed sizes leave gaps | Needs accurate measuring and secure mounting | Highest cost, permanent |
Option A: Freestanding Units
Pros: Cost-effective, movable, no wall modifications required.
Cons: Fixed dimensions can leave unused gaps near walls or ceilings.
Anti-Tip Anchoring (Recommended for Tall Units, Especially with Kids)

- Locate wall studs with a stud finder.
- Attach the anti-tip strap or bracket to the unit’s frame as the manufacturer directs.
- Fasten it to a stud using the hardware supplied or recommended for your wall type.
- Renters: check your lease first, and patch small holes when you move out.
Option B: Modular Wall Systems
Pros: Sectional benches, hutch shelves, and side towers give a semi-custom look at a lower price than custom carpentry.
Cons: Requires accurate measurements and secure mounting.
Mounting Essentials
- Mark stud locations first and plan the layout around them.
- Follow the manufacturer’s installation instructions and the hardware they specify for your wall type.
- Check load ratings for each component. Shelves and hooks often carry far less than the bench.
- If your wall has no studs where the unit needs support, or the wall type is unclear, ask the manufacturer or a qualified installer before mounting anything heavy.
Option C: Custom Built-In Cabinetry
Pros: Floor-to-ceiling design that uses every inch and blends with existing trim.
Cons: Higher cost and permanent installation by a skilled carpenter.
Planning tip: Use moisture-tolerant materials, such as sealed plywood or moisture-resistant panels, in the bench base rather than bare MDF.
7. Pre-Planning Checklist
Review these conditions before ordering materials or hiring a pro:
Your checklist is saved in this browser. Downloads include all tasks and their completion status. These are planning reminders, not installation or code-compliance instructions.
Quick test: Tape the planned footprint on the floor with painter’s tape and walk through it carrying a loaded backpack or laundry basket. It’s the fastest way to catch a tight spot.
Final Takeaway
A well-planned mudroom storage system starts with realistic measurements and clear movement paths. Begin with your entryway’s actual layout, account for door swings, drawer extension, and family traffic, and add the moisture and anchoring details that make the system last.


1 thought on “Mudroom Bench and Storage: Layouts, Dimensions, and Space Planning Guide”
Comments are closed.