Transforming your patio or deck into a private outdoor sanctuary takes more than just putting up a basic barrier. Between nosy neighbors, second-story window angles, gusty winds, and strict HOA regulations, selecting and installing the right patio privacy screen requires strategic planning.
In this guide, we dive deep into 15 real-world design ideas, compare materials with realistic specs and pricing, walk through sightline measurements, and detail step-by-step installation—including essential safety and permit rules.
1. Patio Privacy Screen Ideas for Every Outdoor Space
A successful privacy screen balances visual coverage, airflow, structural stability, and architectural style. Below are 15 actionable privacy screen ideas complete with practical layout advice, sightline impact, and maintenance expectations.
1. Modern Horizontal Wood Slat Panels
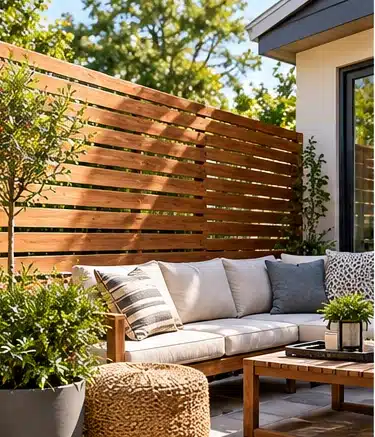
Horizontal cedar or redwood slats mounted on a sturdy timber frame visually widen narrow patio spaces while maintaining a sleek, modern architectural aesthetic. The gaps between slats allow beneficial wind flow while reducing direct sightlines, though actual privacy depends on board thickness, slat depth, and the viewer’s angle.
- Best For: Suburban decks and modern concrete patios seeking warmth without total enclosure.
- Maintenance: Moderate to high. Reapply exterior finishes or sealers according to product instructions and local weather exposure conditions to prevent warping, cracking, and weathering.
2. Vertical Wood Slat Walls
Vertical timber battens spaced along a horizontal header and footer rail draw the eye upward, making small patios feel loftier. They offer strong sightline blocking from diagonal angles, and slat spacing can be customized based on how close neighboring houses are positioned.
- Best For: Narrow side-yard patios or urban townhome decks with tall adjacent walls.
- Maintenance: Moderate. Staining vertical slats requires extra care around joints to prevent water pooling and rot.
3. Laser-Cut Metal Decorative Panels
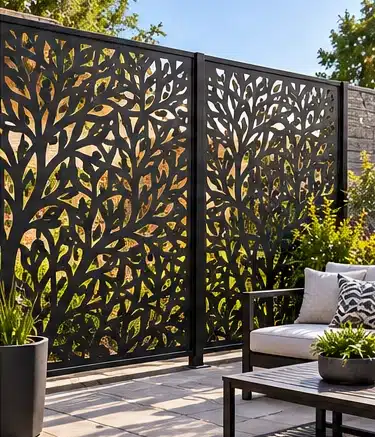
Precision-engineered aluminum or powder-coated steel panels feature geometric, leafy, or abstract cut-out patterns that serve as outdoor art. Their perforated designs help reduce wind pressure compared to solid walls, while pattern density dictates the balance between light passage and privacy.
- Best For: High-end contemporary patios where the screen acts as a focal design element.
- Maintenance: Low. Hose down or wipe clean with soft cloths and soapy water per manufacturer guidelines; avoid high-pressure power washing that can chip powder coatings.
4. Traditional Lattice with Live Climbing Vines
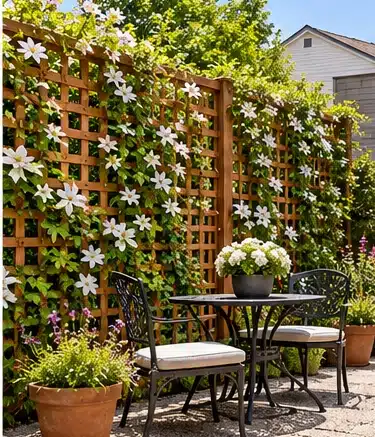
A classic crisscross wood, vinyl, or composite grid paired with fast-growing climbing plants like Clematis, Star Jasmine, or Ivy. It provides light screening initially, turning into dense natural foliage coverage as vines mature while maintaining excellent airflow.
- Best For: Garden lovers and traditional suburban backyards.
- Ecological Note: Check local invasive species lists before planting vines like English Ivy (Hedera helix), which is classified as an invasive weed in several U.S. states (including Oregon and Washington). Opt for non-invasive native climbers where restricted.
- Maintenance: High. Demands seasonal plant pruning, training vines onto the lattice, and ensuring plant weight does not overload the frame.
5. Freestanding Heavy-Duty Planter Box Screens
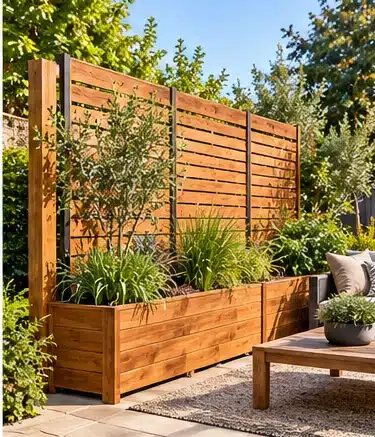
A self-contained wooden or metal planter box featuring a tall built-in rear trellis or slat wall. It offers a highly mobile and modular setup where soil and plant mass provide ballast, though overall stability depends on frame dimensions and local wind exposure.
- Best For: Patios built over concrete slabs or renters who cannot drill into ground surfaces.
- Maintenance: Low to moderate (primarily plant watering and seasonal wood sealing).
6. Outdoor Weatherproof Curtains & Drapes
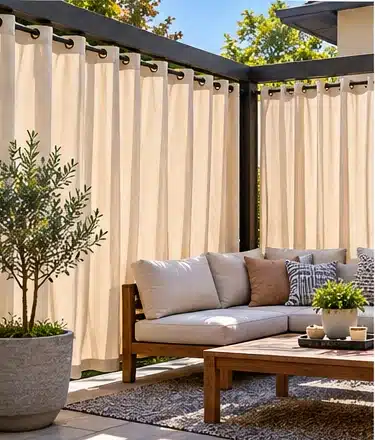
Heavy-duty fabric panels (such as Sunbrella) hung from curtain rods mounted to pergolas or patio overhead beams. They offer high visual privacy when drawn shut and can be tied back on breezy days to maximize open air for a resort-style cabana vibe.
- Best For: Flexible privacy on demand around dining zones or lounge areas.
- Maintenance: Moderate. Fabrics must be cleaned of mildew and should be taken down during harsh winter months.
7. Artificial (Faux) Greenery & Boxwood Walls
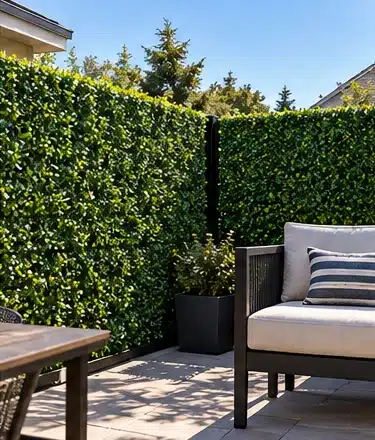
High-density, UV-resistant synthetic boxwood or ivy tiles attached to a wire mesh backing or frame deliver instant year-round green privacy without waiting for live plants to grow. They provide dense foliage coverage that requires only occasional washing to remove dust buildup.
- Best For: Instant privacy on small urban balconies or barren wall surfaces.
- Maintenance: Low. Ensure panels are UV-stabilized to slow down fading and weathering over time.
8. Natural Bamboo & Reed Roll Screens
Flexible rolls of woven natural bamboo poles or split reeds tied onto existing chain-link fences or timber frames provide high privacy at low cost. However, natural materials degrade faster depending on regional humidity and rain exposure.
- Best For: Budget-conscious homeowners and tropical or bohemian patio aesthetics.
- Maintenance: Low initial effort; periodic replacement required as weather takes its toll.
9. Integrated Pergola Drop-Down Panels
Fixed or roller-mounted shade panels built directly into the side bays of an existing wooden or aluminum pergola. Their adjustable opacity allows control over low-angle sun glare while screening elevated views depending on screen placement and observer angles.
- Best For: Multi-functional outdoor living rooms needing dual sun-shading and neighbor privacy.
- Maintenance: Low to moderate depending on roller mechanism complexity.
10. Multi-Panel Folding Room Dividers
Portable 3-panel or 4-panel hinged screens made of weatherized wood, resin wicker, or metal offer instant positioning exactly where needed. They can easily be moved or stored in a garage or shed during high-wind storms.
- Best For: Small balconies, temporary dining privacy, or flexible patio layouts.
- Maintenance: Very low; store indoors during harsh weather.
11. Deck Railing Privacy Extensions
Short privacy panels mounted directly onto existing deck post caps or structural top railings block seated sightlines without creating a boxed-in feeling around the entire deck perimeter.
- Best For: Elevated decks where seated adults are visible over standard building code railings.
- Structural Warning: Standard deck railings are engineered to support lateral human loads, not large solid sail areas exposed to high wind. Confirm structural post attachments before adding panels.
- Maintenance: Matches existing deck railing maintenance.
12. Corner L-Shaped Privacy Nooks
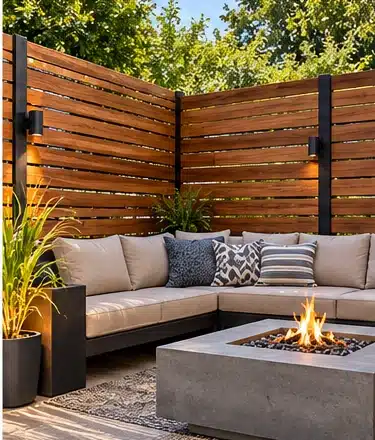
Two screen panels joined at a 90-degree angle create a dedicated private sanctuary, effectively enclosing a hot tub, outdoor shower, or cozy seating corner while blocking sightlines from two adjacent property boundaries simultaneously.
- Best For: Specific high-privacy zones within a larger backyard footprint.
- Maintenance: Varies by chosen panel material.
13. Upcycled DIY Pallet Slat Screens
Cleaned, sanded, and weather-sealed wooden shipping pallets stacked vertically or joined side-by-side offer solid wood backing with built-in mini planter ledges for succulents.
- Best For: DIY enthusiasts looking for rustic charm on a budget.
- Safety Warning: Use pallets only when their origin and treatment history can be verified. An HT (heat-treated) stamp does not guarantee that a pallet has never been exposed to chemicals or spills. Avoid pallets marked MB, visibly contaminated wood, or boards showing signs of structural damage. For a permanent installation, new exterior-rated lumber is generally a more predictable choice.
- Maintenance: Moderate to high sanding, sealing, and insect monitoring required.
14. Mixed-Material Industrial Frames (Steel + Cedar)
Matte black powder-coated steel or aluminum structural posts holding horizontal cedar or composite tongue-and-groove boards create a modern industrial look with high visual coverage and durable framing when properly designed and maintained.
- Best For: Modern industrial home styles and sturdy installations.
- Maintenance: Low frame maintenance; wood slats require periodic staining.
15. Translucent Acrylic & Frosted Glass Panels
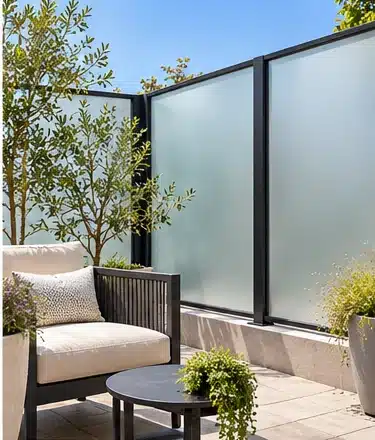
Framed semi-opaque frosted tempered glass or high-impact poly-acrylic sheets mounted in heavy metal posts obscure silhouettes while allowing natural daylight through, functioning simultaneously as an effective windbreak.
- Best For: Modern urban patios needing light passage alongside privacy.
- Maintenance: Low; requires glass cleaner or squeegee maintenance to prevent water spots.
2. Best Patio Privacy Screen Materials Compared
Selecting the ideal material requires balancing upfront cost against relative maintenance demands, wind exposure, and environmental durability.
Compare Privacy Screen Materials
Choose by maintenance effort, visual screening and real-world trade-offs. Actual coverage depends on design, not material alone.
| Material | Maintenance | Privacy | Why choose it | Trade-off |
|---|---|---|---|---|
| Cedar / Redwood | Higher | Adjustable; narrow gaps improve screening | Warm natural grain; can be custom-built | Needs periodic finishing; prone to weathering |
| Powder-Coated Metal | Low | Varies with cutout pattern | Contemporary design; durable finish | Steel may corrode at damaged coating |
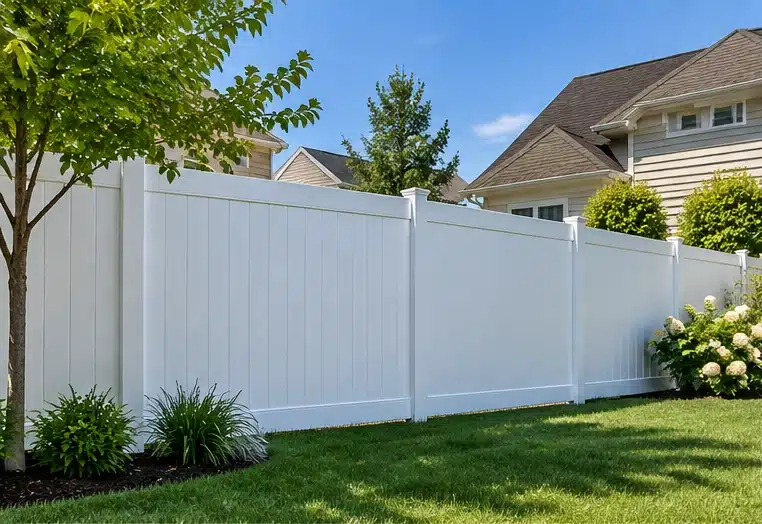
| Composite (WPC) | Low | High when solid | Wood-like look without routine staining | Can be heavy and expand with heat |
| Vinyl (PVC) | Low | High when solid | Resists rot; easy to wash | Appearance and cold-weather durability vary |
| Outdoor Fabric | Medium | Varies with opacity | Flexible and removable | Can flap in wind; regular cleaning |
| Artificial Greenery | Low | Usually dense; backing matters | Instant green look with no watering | UV aging; dust; fastening is important |
*Note: Material durability depends heavily on local climate, UV exposure intensity, quality of installation, and regular care.
Privacy vs. Airflow: Solid, Slatted, and Perforated Panels
When selecting materials, keep structural physics in mind. A solid wall catches incoming wind like a sail, putting significant stress on posts, anchors, and brackets.
- Solid Panels (Tongue & Groove Wood, Acrylic): High visual privacy. Requires properly engineered post footings or structural attachments.
- Slatted Panels (Spaced Slats): Reduces visual sightlines while permitting airflow, significantly reducing wind load compared to solid walls.
- Perforated & Laser-Cut Panels: Balances light filtering, decorative aesthetics, and airflow to manage wind pressure.
3. How Much Do Patio Privacy Screens Cost?
Screen costs vary based on whether you buy pre-manufactured modular panels or build structural wood frames from scratch.
Real Retail Price Examples (Manufacturer Listing Benchmarks)
(Representative list prices verified via official manufacturer product catalogs as of October 2026. Retail prices vary by seller, region, shipping fees, sales tax, and ongoing promotions).
Real Product Price Examples
Manufacturer-listed examples from Enclo. These are different product sizes and mounting systems, not equivalent coverage quotes.
| Product | Listed size | Listed price (USD) | What to check |
|---|---|---|---|
| Concord Cedar Slatted wood • 1 panel | 5 ft H × 3.2 ft W | $119.99 | No-dig screen; manufacturer assembly instructions apply |
| Tiaga Cedar Slatted wood • 1 panel | 6.1 ft H × 3 ft W | $134.99 | Freestanding or surface-mounted options; check included hardware |
| Florence Vinyl Planter WoodTek vinyl • 1 unit | 6 ft H × 3.8 ft W × 1 ft D | $300.00 | Integrated planter; verify wind-related anchoring guidance |
Sample Estimated Project Budget for a 12-Foot Patio Screen
This hypothetical budget assumes approximately 12 linear feet of coverage for illustrative comparison. Note that pre-made metal units and custom DIY cedar builds represent different installation methods and structural profiles. Actual costs depend on panel width, post spacing, hardware choices, sales tax, delivery, and tool availability.
12-Foot Privacy Screen: Sample Budget
Two illustrative approaches to roughly 12 linear feet of screening. Figures are assumptions, not live contractor or product quotes.
| Cost category | Pre-made metal panels | DIY cedar slats |
|---|---|---|
| Panels / lumber | $600 | $350 |
| Mounts / posts / hardware | $90 | $110 |
| Finishes / supplies | $20 | $45 |
| Estimated materials subtotal | $710 | $505 |
4. How to Choose the Right Size, Height, and Placement
Installing a screen that is too short—or placing it in the wrong location—is a common mistake.
How to Measure Your Patio for Privacy Screens
- Sit Down First: Don’t measure while standing up. Have someone sit in your patio dining chair while you stand at the property boundary to check sightlines.
- Determine Needed Clearance: Measure the linear length of the seating area plus extra width on each end to cover diagonal viewing angles.
- Calculate Height Relative to Distance: A 5-foot screen placed closer to your seating area can block direct sightlines just as effectively as a taller screen placed farther away at the edge of the patio, depending on viewer height and elevation.
Sightline Calculation & Elevated Window Screening
Standard vertical screens often struggle to block sightlines originating from a neighbor’s elevated second-floor window or high deck.
Sightline Calculation Example:
- Assumed Parameters: A neighbor’s second-story window viewer has an eye level 10 ft above ground level, positioned 25 ft away horizontally from a patio chair where a seated adult’s eye level is 4 ft.
- Geometry Impact: In this simplified 2D setup, a 6-ft privacy screen placed 6 ft away from the seated person intercepts the direct sightline at an elevation of approximately 5.44 ft.
- Result: In this simplified example, placing a 6-foot screen 6 feet from the seated viewer blocks the direct sightline from the elevated window. Actual privacy will depend on observer position, screen width, changes in ground elevation, and other viewing angles.
Privacy Screen Height Calculator
Will a screen block the view from a neighbor's window? Enter your measurements to check one straight sightline—and see where the screen should go.
This checks only the two specified eye positions.
To solve elevated sightlines:
- Position the screen closer to your seating zone rather than along the distant property line.
- Pair a vertical screen with an angled top trellis extension or overhead pergola canopy.
- Plant small ornamental trees (such as Crape Myrtle or Columnar Hornbeam) directly behind the screen wall to add soft vertical height.
5. Renter-Friendly and No-Drill Patio Privacy Screens
If you are renting a townhome or want to avoid damaging concrete pavers, permanent digging and anchor drilling are out of the question.
Top No-Drill Methods:
- Heavy Planter Box Anchors: Utilize deep planters filled with potting soil and gravel. Soil and planter mass provide ballast for attached trellis panels without permanent drilling.
- Deck Railing Clamps: Specialized steel brackets clamp onto vertical deck balusters or horizontal top rails, holding lightweight privacy screens securely without screws.
- Freestanding Heavy Base Stand Kits: Industrial metal bases held down by concrete patio pavers sliding into base trays.
When No-Drill Screens Are Not Safe
Freestanding privacy screens should only be used with a base or anchoring system approved for the specific panel size and expected wind conditions. Adding weight alone does not guarantee stability, especially on elevated decks or exposed patios.
6. How to Install a Patio Privacy Screen
Proper installation helps a patio privacy screen resist expected wind loads, rain exposure, and ground movement. Depending on your outdoor layout, property permissions, and soil conditions, screens are typically installed using one of three primary methods:
Method 1: Freestanding Privacy Screens
Freestanding units rely on weighted bases, wide footing plates, or heavy integrated planter boxes. They require no excavation or drilling into patio slabs.
- Best For: Renters, temporary seasonal setups, or hardscape patios over concrete pavers.
- Key Considerations: Always follow manufacturer weight specifications for the base (such as sandbags, concrete pavers, or soil mass). Move or fold freestanding units during high-wind warnings.
Method 2: Wall- or Deck-Mounted Privacy Screens
Wall- or deck-mounted screens are permanently affixed to existing timber deck structures, concrete patio slabs, or exterior building walls using specialized surface flanges, concrete anchors, or heavy-duty brackets.
- Best For: Elevated wooden decks, townhome balconies, or concrete patio slabs with permanent layouts.
- Key Structural Warning: Simply attaching a tall privacy panel directly to decorative deck railing balusters or thin top rails rarely provides sufficient support. Privacy screens create substantial wind leverage that can damage or fail decorative railings. Ensure that mounting brackets anchor directly into dedicated structural posts (4×4 or 6×6 timber posts securely tied to the deck framing below) or solid masonry walls, using corrosion-resistant stainless steel or galvanized hardware.
Method 3: In-Ground Post Privacy Screens
In-ground post installations can provide a stable, permanent support system when the posts, footings, and connections are properly designed for local soil and wind conditions. They typically require more planning and site preparation than portable screen options.
Patio Privacy Screen Installation Checklist
Check each item as you confirm it. Use this list to spot missing planning steps—not to certify structural safety or code compliance.
01 Planning & permissions
02 Measurements & materials
03 Mounting & wind safety
04 Final pre-install checks
Mark off the items you have actually confirmed. Any unchecked item needs attention before installation.
Before Digging: Permits, Utilities, and Structural Checks
- Call 811 Before You Dig: Contact 811 or your state’s designated utility notification service before digging. Required advance notice varies by state (e.g., at least 2 business days in Oregon, 3 business days in Michigan). Wait for utility markings before excavating. Visit 811beforeyoudig.com for local details.
- Building Permits & HOA Rules: Permit requirements vary by municipality, screen height, and attachment type. Always verify local building codes and HOA rules regarding height caps and material restrictions.
Step-by-Step In-Ground Post Setup:

- Determine Hole Specs: Establish post-hole depth and width based on local frost depth, soil type, panel dimensions, and manufacturer specifications.
- Add Gravel Base (If Applicable): Depending on the foundation design and manufacturer instructions, adding a layer of crushed gravel at the bottom of the hole helps with drainage around timber posts.
- Set and Level Posts: Position posts and use a post level on two adjacent sides to ensure exact plumb alignment.
- Pour Concrete: Fill the hole with quick-setting concrete, sloping the top slightly away from the post to shed water.
- Attach Panels: Allow concrete to cure per manufacturer instructions before mounting heavy privacy panels.
7. How to Maintain and Weatherproof Outdoor Privacy Screens
Consistent maintenance preserves structural integrity and keeps outdoor materials looking fresh season after season.
- Wood & Bamboo Care: Clean annually with a mild deck cleaner. Re-apply a penetrating UV-inhibiting oil or semi-transparent stain as needed to prevent wood splitting and graying.
- Powder-Coated Metal Care: Wash down periodically using a soft cloth, mild soap, and warm water. Avoid abrasive sponges or high-pressure washers that can degrade protective coatings. Repair deep scratches using rust-inhibiting touch-up paint immediately.
- Fabric & Vinyl Care: Scrub vinyl with a soft-bristle brush and mild detergent to remove green algae stains. Remove fabric drapes during freezing winter seasons and store them in dry containers.
8. Common Patio Privacy Screen Mistakes to Avoid
- Creating a Solid Wind Sail: Installing solid, unvented panels in high-wind zones without proper structural engineering. Wind force can snap mounting brackets or damage deck framing.
- Ignoring Drainage & Soil Line: Allowing wooden screen bases to touch bare soil or garden mulch directly. Always maintain clearance between wood bases and ground level to prevent moisture wicking and rot.
- Measuring Only Seated Views: Forgetting that tall observers standing on adjacent elevated decks can easily see over low screens.
- Skipping Boundary Surveys: Building a heavy, permanent timber privacy screen directly over your property line without reviewing your official land survey map.
9. Frequently Asked Questions About Patio Privacy Screens
Q: Do I need a building permit for a patio privacy screen?
A: Permit requirements vary by city, screen height, material, location, and whether the structure is freestanding or permanently attached. Check your local building and zoning rules, property boundaries, and HOA requirements before installation.
Q: How do I stop a privacy screen from blowing over in strong winds?
A: Perforated and slatted designs may reduce wind pressure compared with solid panels, but no fixed percentage of open area guarantees safety. Ensure that the entire screen assembly, including panels, posts, and anchors, is rated and properly engineered for your specific installation environment.
Q: What is the best low-maintenance privacy screen material?
A: Powder-coated aluminum and high-grade composite (WPC) panels offer excellent low-maintenance performance. They do not rot or require periodic staining—just an occasional rinse with a garden hose or mild soap solution.
Q: How far apart should wood slats be spaced for privacy?
A: Spacing depends on your desired balance of airflow and sightline coverage. Narrow gaps (such as 0.5 inches) offer greater visual screening, but board thickness, slat depth, and observer viewing angle also dictate how much is visible through the screen.